
Learning how to organize a deep pantry is mostly about fixing one problem: the back of the shelf. Deep shelves of 20 to 30 inches hold a lot, but anything past the first row disappears, gets bought twice and expires behind the cereal. The fix isn’t more containers. It’s a system of zones, pull-out bins, turntables and risers that brings the back of every shelf to the front, with the true back row saved for overstock you only reach for once a week.
⏱️ Short on time?
Grab our FREE printable checklists — the exact routines behind every calm home on this blog:
📋 Room-by-Room Checklist (PDF)📅 Weekly Reset Checklist (PDF)
Part of our Kitchen Cleaning & Organization Guide, which brings every related post together in one place.
This guide walks through measuring your shelf depth first, then setting up zones, choosing the right deep pantry storage ideas for each shelf height, and labeling everything so it stays put. It works for a walk-in pantry, a reach-in closet pantry or a deep kitchen cabinet.
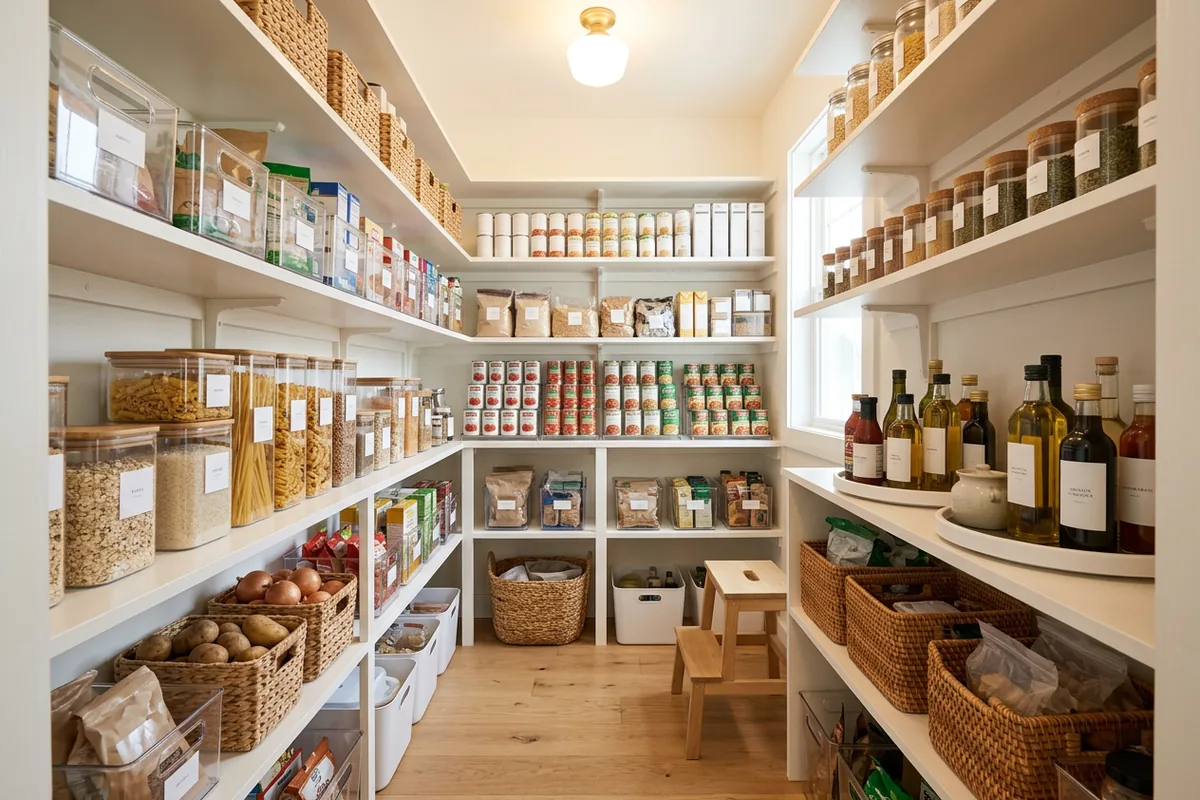
How to Organize a Deep Pantry: What You’ll Learn
- How to measure pantry depth and buy bins that actually fit
- How to zone a deep pantry so everyone can find things
- Where pull-out bins, turntables and risers work best
- How to use the back row for overstock without losing food
- Labeling and simple habits that keep it organized
Why Deep Pantries Get So Messy
Most pantry shelves are built for storage volume, not visibility. A standard reach-in pantry shelf is 12 to 16 inches deep, but walk-in pantries and closet conversions often run 20, 24 or even 30 inches. On a shelf that deep, you can see about one row of items and reach about two. Everything else becomes a guessing game.
Deep pantry shelves organization works when you stop treating the shelf as one flat surface and start treating it like drawers. If you can pull the back forward, spin it around or lift it up to eye level, you can use every inch without losing anything. If you’re starting from scratch, our pantry organization ideas cover the basics of clearing out and sorting first.
Step 1: Empty, Sort and Measure Depth
Before you buy a single bin, empty the pantry completely. Toss anything expired, stale or opened and forgotten, and group what’s left on the counter by type: grains, cans, snacks, baking, breakfast, sauces and oils, and backups.
Then measure every shelf. You need three numbers per shelf:
- Depth: from the front edge to the back wall. Measure at both ends, since older walls are rarely square
- Usable height: from the shelf surface to the underside of the shelf above
- Width: wall to wall, minus any door trim or hinges that stick out
Subtract about half an inch from the depth so bins slide without scraping the wall, and about an inch from the height so you can lift a lid or tip a bin forward. Write the numbers on your phone and take them shopping. The most common mistake is buying 12-inch bins for a 24-inch shelf, which just creates a new hidden back row.
Quick sizing guide by shelf depth
- 12 to 16 inches: single-depth clear bins, a small turntable, a 3-tier can riser
- 18 to 22 inches: long pull-out bins of 15 to 18 inches, a 12-inch turntable, a two-row riser setup
- 24 to 30 inches: two bins front-to-back (the back one for overstock) or one long bin with a handle, a large 16 to 18 inch turntable, or a sliding drawer insert
Step 2: Create Zones That Make Sense
Zones are the backbone of any deep pantry. Each shelf, or each section of a shelf, gets one job, and everything that does that job lives there. When a zone is full, you know it’s time to stop buying.
- Eye level (roughly 48 to 66 inches): daily items like breakfast, snacks, pasta, rice and open baking supplies
- Waist level: heavy items like cans, jars, oils and drinks, so you’re not lifting them overhead
- Low shelves and floor: potatoes and onions in breathable baskets, bulk bags, pet food, water and kids’ snacks they can reach themselves
- Top shelf: holiday baking, party supplies, small appliances and paper goods you use occasionally
Keep like with like across the whole pantry. All the breakfast items go together, even if cereal, oats and syrup are different shapes. If your kitchen is small and the pantry doubles as appliance storage, borrow a few space-saving tricks from our small kitchen organization ideas.
Step 3: Use Pull-Out Bins Like Drawers
Pull-out bins are the single best fix for deep shelves. A long clear bin with a front handle turns a 24-inch shelf into a drawer: you pull it out, see everything inside and slide it back. Look for bins that are almost the full depth of your shelf, with straight sides so they sit flush next to each other.
- Choose clear plastic or acrylic so you can see contents from the front
- Pick a built-in handle or cut-out at the front; it matters more than looks
- Use one category per bin: snack bars, pouches, baking, pasta, sauce packets
- For very heavy items like cans, consider a metal pull-out drawer or a glide-out shelf insert instead of a plastic bin
- Leave 2 to 3 inches of headroom above each bin so you can see over the front edge
For grains, flour and cereal, decant into airtight containers that fit inside or between your bins. Our guide to food storage container organization ideas helps you choose shapes that stack well on deep shelves.
Step 4: Add Turntables in the Corners
Corners are the deadest space in a deep pantry, especially in L-shaped and U-shaped walk-ins. A turntable, often sold as a lazy susan, brings the back of that corner to the front with one spin.
- Use a 12-inch turntable on 16-inch shelves and a 16 to 18 inch one on 20 inch or deeper shelves
- Store oils, vinegars, sauces, nut butters and syrups, which are tall bottles that tip over in bins
- Choose a version with a raised lip so bottles don’t fly off
- Two-tier turntables work well for spices, jars and small condiments
- Use divided turntables for snack packs or tea boxes
If your spices have outgrown the pantry turntable, see our spice cabinet organization ideas for drawer and door options.
Step 5: Lift Items Up With Risers
Risers solve the other half of the visibility problem: short items hidden behind other short items. A tiered can riser or step shelf lifts each row a couple of inches higher than the one in front, stadium-style, so every label shows.
- Use 3-tier expandable risers for cans, jars and spice bottles
- Add a shelf riser (a small bridge shelf) to split tall shelf space into two levels for plates of snacks or boxes
- Try under-shelf baskets that hook onto the shelf above for wraps, bags and flat packets
- Use rolling can organizers that feed cans to the front as you take one
Risers work best on the front half of a deep shelf. Put the riser at the front and keep the back row for overstock behind it.
Step 6: Make the Back Row Your Overstock Zone
On a 24-inch or deeper shelf, don’t fight the back row. Give it a job: backup items you bought in bulk or on sale. This is one of the most useful deep pantry storage ideas because it keeps a reserve without letting it mix with what’s open.
- Store unopened backups directly behind the matching open item, so cereal backup sits behind the open cereal
- Use a lidded bin labeled ‘Backup’ or ‘Overstock’ for small items so they don’t scatter
- Use the first-in, first-out rule: new purchases go to the back and older ones move forward
- Do a 2-minute overstock check before each grocery shop to avoid buying duplicates
- Keep the overstock zone to one row; if it spills into the front, you’re buying too much
Step 7: Label Everything
Labels are what keep a deep pantry organized after the first week. They tell everyone in the house where things go back, not just where they are.
- Label the front of each bin and the shelf edge, so the spot stays named even when a bin is out
- Use broad category labels like ‘Snacks’, ‘Baking’ and ‘Breakfast’ rather than specific products that change
- Add a small date label to decanted flour, rice and grains
- Use picture labels for younger kids
- Choose removable labels or chalkboard tags so you can adjust zones later
Keep It Organized: 10-Minute Weekly Habits
- Before shopping, pull each bin forward, check what’s low and add it to the list
- Move older items forward and newer ones back
- Wipe one shelf a week with a damp cloth
- Donate unopened food you won’t use while it’s still in date
- Reset any zone that’s overflowing, which is usually a sign to buy less of that category
Your fridge benefits from the same zone-and-bin approach. See our fridge organization aesthetic ideas for clear bins and grouped categories that match your pantry.
Related guides
Save this for later
Pin this image to your Pinterest board so it’s there when you need it.
 Save to Pinterest
Good to know: Not sure how long pantry staples keep? The USDA’s shelf-stable food safety guide explains storage times for cans, dry goods and more.
Frequently Asked Questions
What is the best way to organize a deep pantry?
Measure each shelf first, then set up zones by category. Use long pull-out bins that run almost the full shelf depth, turntables in corners, and risers for cans at the front. Keep the back row for unopened overstock and label every bin.
How deep should pantry shelves be?
Most pantry shelves work best at 12 to 16 inches, since you can see and reach everything. Deeper shelves of 20 to 30 inches hold more, but they need pull-out bins, turntables or drawer inserts so items at the back don’t get lost.
What size bins should I buy for deep pantry shelves?
Buy bins about half an inch shorter than your shelf depth and an inch shorter than the usable height. On a 24-inch shelf, choose one long bin of about 22 inches, or two 11-inch bins front to back with the back one for overstock.
Are lazy susans good for deep pantry shelves?
Yes. Turntables are ideal for corners and deep shelves because one spin brings the back to the front. Use a 12-inch turntable on standard shelves and a 16 to 18 inch one on deep shelves, and choose one with a raised lip for bottles.
How do I keep a deep pantry organized?
Label bins and shelf edges, store backups behind matching open items, move older food forward, and do a quick check before every grocery trip. A 10-minute weekly reset keeps zones from overflowing.
A deep pantry doesn’t have to be a black hole. Once you measure, zone and turn each shelf into a set of drawers with pull-out bins, turntables and risers, every item has a spot you can see and reach. Start with one shelf this weekend, and the rest of the pantry will follow.